Makeover Madness…the Kitchen
As many of you know, Ryan and I started out living in the country, and no..that does not mean to my city friends a small town. It means your closest neighbor is 1/2 a mile away, your surrounded by fields, and you need a large riding mower in order to get the grass cut in under 3 hours! Ryan actually bought this house a few years before we got married and completely gutted it and started over from the 2×4’s. It was over 100 years old and was quite the sight I am told. Fortunately he’s handy…and had a lot of friends help him out (thanks guys!) and it turned out to be a cute little house.

We called it and still call it “The Birdhouse.” I think because it was a cute little one bedroom house that was narrow and two stories. Anyway, the looks changed a bit when I came along, we redid a few things but unfortunately I don’t have pictures of that. But, when we found out we were expecting 6 months after we were married we realized that this little one bedroom house wasn’t gonna cut it for a family of 3, so we started house hunting. Fortunately we hit the market when it was starting to crash (not sure if it is a good thing, but it was for buyers…) and after looking at quite a few houses we ended up buying the parsonage that our church was selling. Ryan’s little fixer-upper house ended up being a good investment and we could now call a 5 bedroom, 3 bathroom house our home for a good price. Our goal was to still keep me home with our babies once they came and therefore we couldn’t be married to our mortgage. Although I love our house now, it took a little “envisioning” the first time through. Luckily I am up for projects, as well as Ryan, and we ended up spending a couple of months fixing and changing before we actually moved in. During this blog of makeover madness I will be sharing pictures of the before and afters that we did and how we did it on a minimal budget!! The first one I am going to show you is our kitchen.

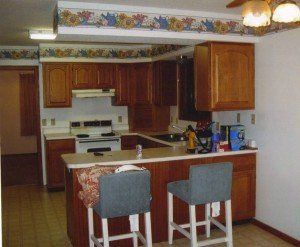
haha..okay, fat chance…another dream:) This is actually Kim Kardashian’s kitchen that I saw the other day on Rachael Ray and fell in love with! But like I said, we did ours on a BUDGET..so here’s the pictures of ours BEFORE…
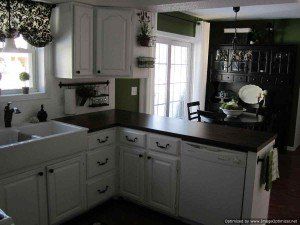
I know many people love oak and I got a few weird looks when I decided to paint over ALL of the oak in our house, so if you are one of those people please don’t be offended:) it’s just a preference! I also am not a huge fan of wallpaper, so that came down too…
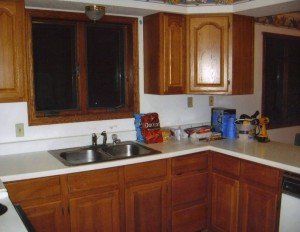
Whoops…shows our healthy eating habits, especially while working!
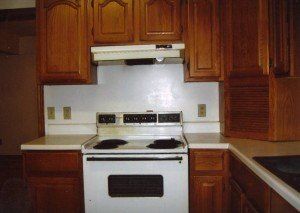
Another beautiful shot… and lastly,

Now for the fun, at least if you like before and afters as much as I do, which is why we had to eliminate HGTV in our house:)
The fridge alcove
Amazing what some paint does huh?? I’ll break it all down what we did at the end of the blog, and the cost.
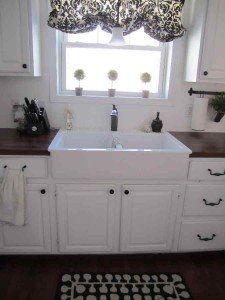
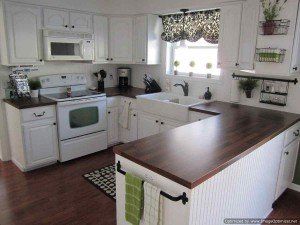
My true love!! I wanted an apron sink so bad so this was a splurge, but since it’s from IKEA it wasn’t too bad, I think it was around $200

This has been my latest project, the shelving…which was much needed. I’ll do a how to blog on that later to show you my before junk corner, not pretty!
Our eat-in kitchen area, we did change the window to a patio door which has been great for light and summer entertaining!
and that’s it…
So here’s the breakdown of what we did to our kitchen and how much it cost. I am showing you this merely to realize that you do not need to spend thousands of dollars to redo a large area. I always get frustrated with shows/blogs that redo an area but it seems so out of reach financially, so here it is…
- First we invested in a paint sprayer ($150 from menards) and took off the cabinet doors and sprayed them, we also used the sprayer for the rest of the house so it was a wise investment. This was an amazing transformation to lighten the whole room.
- We bought hardware to install on the cabinets since they had none on them. This also is a cheap fix! I found my knobs on ebay for $1.19 a piece and my pulls for $2.00 a piece. I also did this project by myself, a power drill and your good to go.
- Replaced both the sink and faucet. I already told you I got the sink at ikea and I found my faucet again on ebay (can you tell I love that place?) for $75.
- New appliances. We replaced the stove, dishwasher, and fridge. We found those appliances and a washer and dryer on craigslist all for $1000, not bad.
- New flooring. We put engineered hardwood floor throughout our whole first level, minus the living room for $800. We found a closeout at Home Depot on the flooring and then installed it ourselves. Not that hard of a project! I was the gluer and Ryan was the installer:)
- New lighting. We changed out all of the lights in our house and most I was able to get from my sister who is a lighting manager at a large store, so I was able to get them for 10% above cost. To redo our whole house cost about $500, but for the kitchen only $75. The little chandelier is from Ikea as well.
- New Countertops. I actually lived with the white countertops that were previously in the house for about 2 years. We weren’t able to do everything all at once and that was one area we waited on. I spotted these laminate butcher block countertops at Ikea right away, but since it wasn’t in the budget had to wait. By the time we had the money saved and I went back, they were discontinued!!! Oh the frustration! But, thanks to some amazing friends (Sarah) they found some in New York and hauled them back in their mini-van for us, sweet, I know! We ended up getting them even cheaper and the total cost was only $200!! What a steal:)
- Accessories. I just pick things up here and there when I find something that is calling my name:)
So the financial breakdown:
Paint=$100.00
Hardware=$50
Sink &Faucet=$300
Appliances=$700 (for kitchen)
Flooring=$400 (for kitchen)
Countertops=$200
Accessories=$150
Grand Total= $1900– Not too bad for a complete transformation, painting your cabinets is an amazingly cheap route to go if you want a new look. I just helped a friend paint her’s cream and it was a great update, I’ll show a picture of that sometime too!
If you have any questions leave a comment, otherwise check back next Friday to see the transformation of the living/dining room!